ZX Spectrum Ghost 'n Goblins: graphics routines
Ghost 'n Goblins is a game released in 1986 by Keith Burkhill. It is a conversion of the arcade game with the same name by Capcom. The ZX Spectrum has a 3.5mhz Z80 8-bit CPU and no graphics acceleration hardware support (i.e. no hardware sprites or hardware scrolling). Considering these limitations it is quite an achievement how this game manages to run a almost full screen 8-way smooth scrolling playfield at good frame rates.
This article will try to explain the graphics routines used in this game.
Screen overview
Screen refresh
Let's take a look how the game paints a frame. In this video the emulation speed is reduced so we can see exactly the order of which things are painted. The screen is also filled with all pixels set and attributes set to white on black to fully show what is going on.
Here is another example from later in the same level.
And from the next level.
Some things to note:
The playfield is painted top to bottom.
All pixels of the playfield are updated every frame, even when the playfield is not scrolling.
The painting of background and sprites are mixed so that sprites are painted directly after the background behind them has finished painting
Sprites are painted in top-to-bottom order.
It paints directly to video memory without using a back buffer
Attributes are only updated at edges of the scenery (see blue edge of fence and yellow edges of platform). This will colorize the background while minimizing the number of writes to attribute memory area. This works because scrolling never moves in greater steps than a single attribute block
Every line of scenery is painted right-to-left (decreasing in memory). This is because of the technique used by PUSHing values onto stack described later.
Because of the strict top-to-bottom behavior it can "race the beam" and avoid graphics tearing or flickering that would otherwise be a problem when painting directly to video memory. But it takes very fast routines to be able to do that so lets continue with examining how those routines work.
Clipping
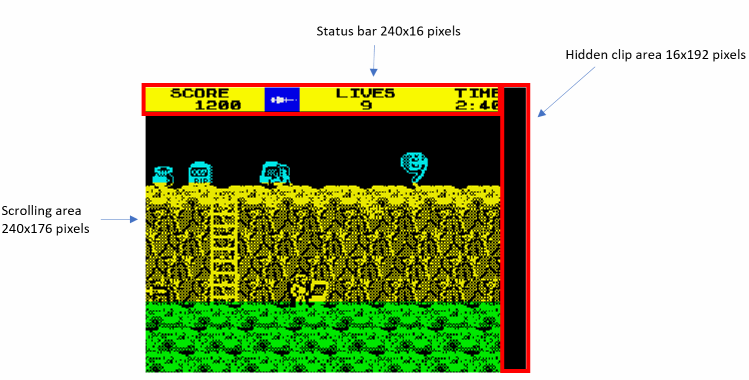
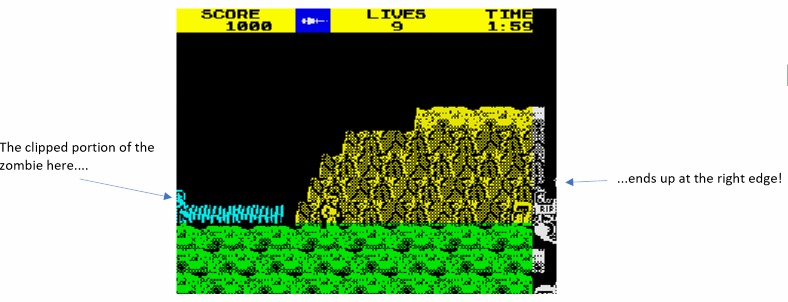
The hidden clip area works like this: The attributes for this area is set to black pixels on black background which means any graphics written there will not be visible. A sprite that is painted at the right edge of the scroll area does not need to have any specialized code for clipping, it can instead just paint into the black area. So why is there no border at the left edge? Here is the clever part: a sprite painted at the left edge will also paint the clipped portion into the right border because when you decrease the address pointer at the left edge it will end up at the right edge 8 pixels above. Since no sprite is larger than 16 pixels in width (24 pixels when pre-rotated), it is enough with a 16-pixel border for all clipping.
The flying demon is 32 pixels in width but is painted as two separate 16-pixels width sprites. Top and bottom clipping is trivial, just call the regular sprite routines with start address and number of lines to paint adjusted to the vertically clipped portion.
This image shows the content of the clipping area when we turn on attributes.
Painting sprites
The game uses several different specialized sprite routines for maximum speed. Sprites that doesn't move are painted with ORing against the background (examples of this are the shooting plant and the princess). Most moving sprites are painted with masks that is ANDed on background for best visual results as this makes it possible to outline sprites to better distinguish them from the background.
![]()
The "paint masked pre-rotated 16-pixel width sprite with variable height" is located at address 0x8ea8. Since the sprites are pre-rotated this means it updates 24 pixels in width. The graphics and mask data is interleaved. Here is the Z80 disassembly.
xxxxxxxxxx;Draw sprite 16 pixels wide. b holds nr of lines/2 (max 4). c' holds nr of rows. hl=screen. de=sprite data.
  ld (0xbfa4),sp      ;store stack because this routine use the stack to read sprite data  ex de,hl  ld sp,hl            ;stack now points to sprite data  ex de,hl  xor a
nextline2:  ex af,af'
nextline:  pop de              ;pop mask and sprite  ld a,(hl)           ;load from screen  and e               ;AND mask value             or d                ;OR sprite value  ld (hl),a           ;store to screen  dec l               ;move left to next position on screen
  pop de              ;repeat above for next 8 pixels    ld a,(hl)  and e  or d  ld (hl),a           ;...store to screen  dec l
  ld c,e              ;save mask to c  pop de              ;pop mask and sprite  ld a,(hl)  and e  or d  ld (hl),a           ;store to screen  inc h               ;move to next line
  ld a,e              ;reuse mask from previous line  pop de              ;pop sprite only (mask is reused from previous line)  and (hl)            ;AND screen to mask  or e                ;OR sprite data  ld (hl),a           ;store back to screen  inc l               ;move right to next position (follows zigzag pattern)
  ld a,(hl)           ;load from screen  and c               ;AND mask saved from previous line  or d                ;OR sprite data  ld (hl),a           ;store to screen  pop de              ;pop mask and sprite  inc l               ;move right to next position
  ld a,(hl)           ;load from screen  and e               ;AND mask value  or d                ;OR sprite value  ld (hl),a           ;store to screen  inc h               ;move to next line
  djnz nextline       ;loop nextline
  ld a,l              ;calculate screen address to start of next 8 lines  add a,0x20          ;add 32 to screen pointer  ld l,a  jr c,addr_ok        ;jump if addition resulted in overflow (this means we are at next 64 line segment)  ld a,h  sub 0x08            ;subtract 8*256  ld h,aaddr_ok:
  exx  dec c               ;decrease rows counter  exx  jr z,lessthan8      ;no more full rows, check for less than 8 lines left
  ld b,0x04           ;next row, set b to 4 which means 8 lines  ex af,af'  jp z,nextline2      ;on z, loop back up and paint more lines  jr done             ;else jump to done
lessthan8:  exx                 ;less than 8 lines left to paint  ld a,b  exx  or a  ld b,a  jr nz,nextline2     ;loop back up and paint more lines
done:  ld sp,(0xbfa4)      ;restore stack  ret                 ;return
Things to note:
The mask is reused for every second line (meaning that the mask is stored in memory at half the vertical resolution). This both saves memory and improves performance at a small cost of visual quality.
It paints in a zig-zag pattern: right to left, down, left to right, repeat. This is for performance: Target address is stored in HL register and the Z80 allows H and L parts of this register to be modified separately. "
inc l" increase the target 8 pixels to the right. "inc h" increase one pixel down. This works within the same "row" of 8 lines, after that this piece of code navigates to next row. The ZX Spectrum has a peculiar video memory layout but the method used here is very efficient.It paints two lines on each iteration. It is safe to do that because sprites always move in 2-pixel increments and are only located on even coordinates.
There is no need for erasing sprites at previous location because the background is repainted every frame
Sprite storage vs runtime format
Sprites are stored in compact form and then pre-rotated and mirrored to temporary buffers when the game start. Sometimes this happens even during gameplay (for instance when the player takes a hit and loses the armor you can notice a short delay, this is because the game then pre-rotates and mirrors the player graphics without armor). Pre-rotation is done in 2-pixels steps so each sprite is rotated 4 times.
The routine that copies a masked sprite to the runtime format is located at address 0x6792 for the graphics and 0x6ae9 for the mask. The routine that mirrors a sprite is located at 0x69bb. The routine that rotates a masked sprite is located at address 0x6a8f for the graphics and 0x6b06 for the mask. They are straightforward so the disassembly of those routines are omitted here.
These are the masked sprites that are in the game.
![]()
Notes:
The flying demon is composed of two sprites.
The sprites are either 16x24 or 16x16 in resolution.
Painting background
We know that the background is fully updated on every frame. If every pixel was unique then the whole operation of reading 240x276 pixels from memory and then write them to video memory would just be too slow, no matter how much we tried to optimize the code. So what can be done? We can't reduce the number of writes but we can reduce the number of reads by using the fact that the background is made of repeating patterns. And that typically the background is composed of around 50% empty space.
By identifying runs of repeating patterns of empty space or graphics these can be painted as a individual specialized function call.
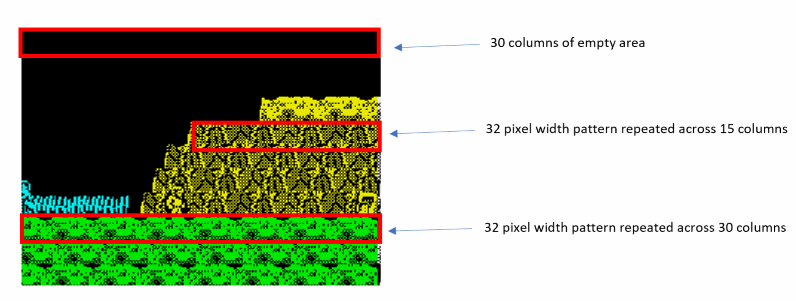
Clearing empty parts of the background is made by specialized routines for each horizontal length of the block that should be cleared, all the way from 2 columns up to the full scrolling view width of 30 columns (incremented in 2-column steps since we have a 2-column width clipping area). So for the 30-column empty area in the picture above we call the "clear screen line 30 column" routine.
Here is an example of such a routine that clears 12 columns of pixels:
xxxxxxxxxx;0xaf6a: clear screen line 12 columns. HL=target. DE=0. B=nr of lines/2nextline: ld sp,hl ;set stack to video memory ;the number of PUSH instructions below is different in every routine push de ;clear 2 columns by pushing DE register push de ;...2 more columns push de ;...2 more columns push de ;...2 more columns push de ;...2 more columns push de ;and now we have a total of 12 columns inc h ;next line ld sp,hl ;set up stack push de ;and clear push de push de push de push de push de inc h djnz nextline ;repeat for next set of two lines ;...rest of routine omitted hereThere are 15 of these routines, one for each horizontal length, that varies only in the number of push instructions in the inner loop.
Painting a repeating background pattern is done the same way. There are specialized routines for every 2-column increment in length so 15 routines in total.
Here is an example:
xxxxxxxxxx;0xa62b copy repeated 32 bit pattern to screen in 30 columns.                           ;...omitted lines before inner loop                           nextline:           ;hl=pattern data. hl'=video memory.  ld bc,0x0007  add hl,bc  ld sp,hl          ;set stack to pattern data  add hl,bc  pop de            ;read 4 bytes of pattern data to registers  pop bc  ld sp,hl          ;now do the same for 4 more bytes, into shadow registers  exx  pop de  pop bc  ld sp,hl          ;stack now points to video memory  push de           ;push 32-pixel pattern kept in registers DE and BC 7.5 times to fill up 30 columns  push bc  push de  push bc  push de  push bc  push de  push bc  push de  push bc  push de  push bc  push de  push bc  push de  inc h  ld sp,hl  inc h             ;next line  exx               ;use shadow registers as source  push de           ;30 columns  push bc  push de  push bc  push de  push bc  push de  push bc  push de  push bc  push de  push bc  push de  push bc  push de  dec a  jr nz,nextline    ;repeat for next set of two lines
;...rest omitted
Notice that stack is used both for reading pattern data and to write to video memory for maximum speed.
The graphics is pre-rotated in 2 pixel increments and rotated in such a way that pixels that are shifted out to the right edge enters on the left edge again. Thanks to this format there is no need to blend the background graphics in any way, they can simply be written as fast as possible to the screen. There are separate routines for painting the edges.
Conclusion
Most of the optimizations are done using specialization. A lot of cycles are saved by writing specific routines for every case that would otherwise require expensive testing for various conditions. This does increase the code size: at least 35 different routines are used in combination to fill the screen. Transferring data using the hardware stack is also an important optimization.
I'm sure there are a lot more interesting techniques that are left to uncover in this game. Send me a message if there is something specific I should add or if you want help with making your own investigations.
Link to YouTube video where someone finishes the game (using cheats because the game is frustratingly hard and unfair to play, just like pretty much all 8-bit titles 😀).